
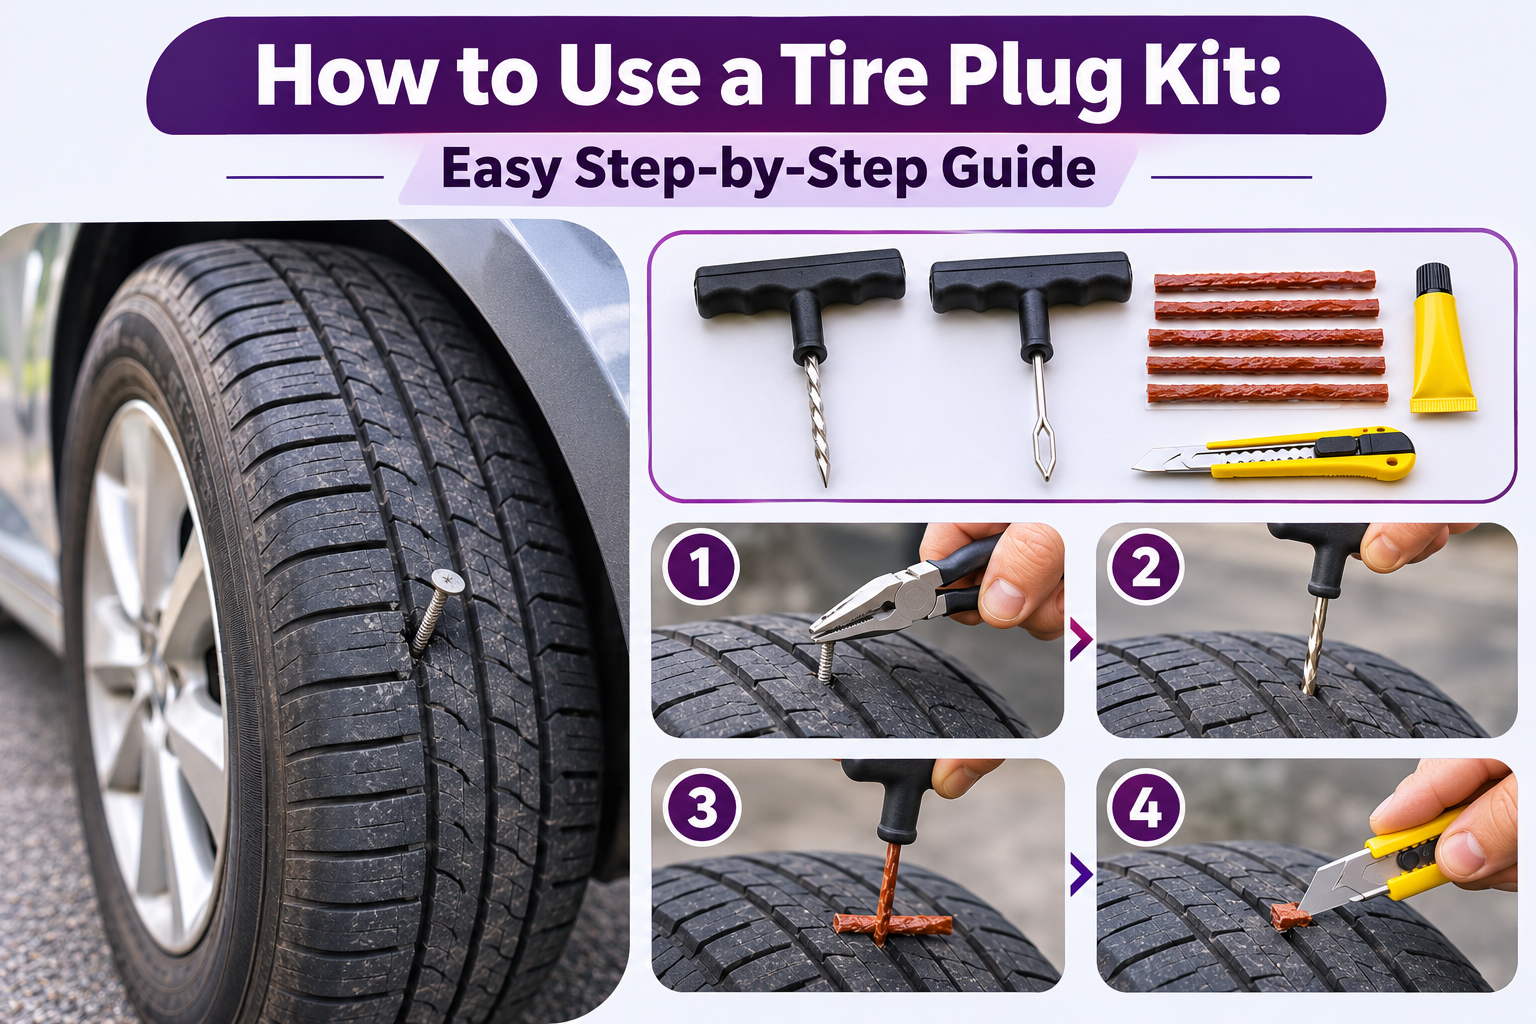
A flat tire can happen unexpectedly, especially when a nail or screw punctures the rubber. Knowing how to use a tire plug kit can help you handle a minor puncture during an emergency. These compact kits contain simple tools that temporarily seal small holes in tubeless tires. However, using them correctly is important for your safety. In this guide, you’ll learn what a tire plug kit contains, how to insert a tire plug step by step, common mistakes to avoid, and when professional tire repair is necessary.
What Is a Tire Plug Kit and How Does It Work?
A tire plug kit is a collection of tools designed to temporarily seal small punctures in tubeless tires. It generally contains sticky rubber plugs, a reaming tool, and an insertion tool. When installed, the rubber plug fills the puncture channel and helps reduce air leakage. The kit can be useful during roadside emergencies, but an external plug alone does not meet industry standards for a permanent tire repair.
Main Components of a Tire Plug Kit
Most standard tire plug kits include several essential items.
- Rubber plugs: Sticky rubber strips that fill puncture holes.
- Reamer tool: A rough, pointed tool that cleans and prepares the puncture channel.
- Insertion tool: A T-shaped tool with an eyelet or split tip for installing the plug.
- Rubber cement: An optional adhesive included with certain kits.
- Utility blade: Used to trim excess plug material after installation.
Some kits also include pliers, gloves, and a pressure gauge.
How Does a Tire Plug Seal a Puncture?
A tire plug works by filling the narrow passage created by a nail, screw, or similar object.
The sticky rubber material compresses inside the hole. This helps block escaping air and temporarily restore tire pressure.
However, the plug does not seal the inner liner or reveal internal tire damage. A professional repair requires internal inspection and an approved combination of a plug and an inner patch.
What Do You Need Before Using a Tire Plug Kit?
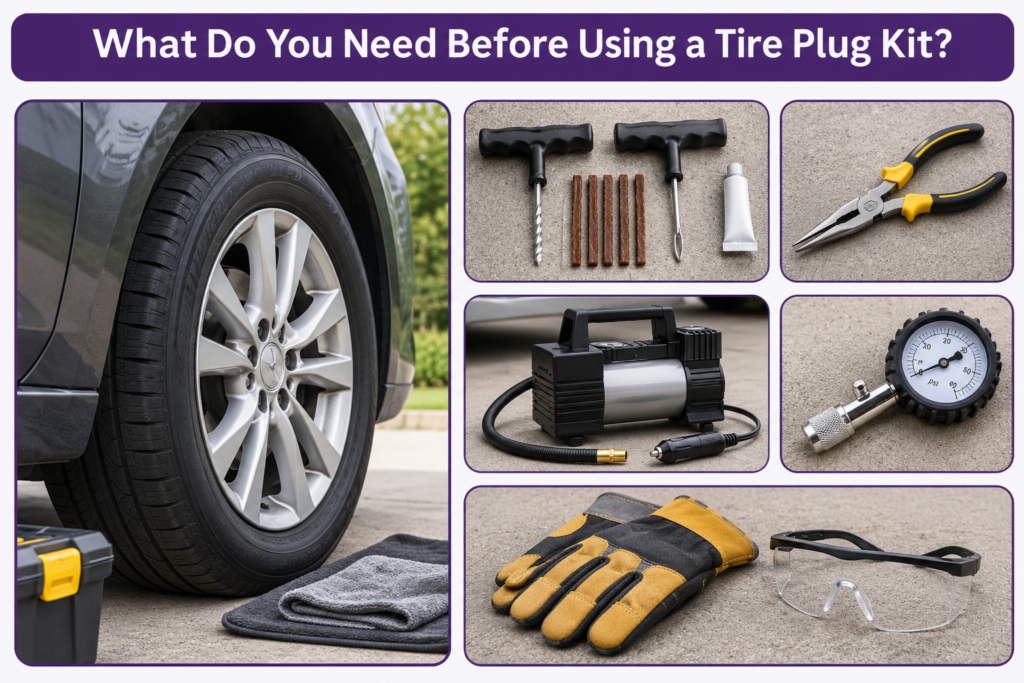
Before starting, collect the necessary equipment and check the tire’s condition. Having everything ready makes the process easier, especially during an emergency. A tire plug kit alone is not enough if the tire has already lost significant pressure. You’ll also need a suitable air source to inflate it after plugging.
Essential Tools and Materials
Prepare these items before attempting a temporary puncture repair:
- Tire plug repair kit
- Needle-nose pliers
- Portable tire inflator or air compressor
- Tire pressure gauge
- Spray bottle with soapy water
- Protective gloves and safety glasses
- Flashlight for low-light conditions
Always read the manufacturer’s instructions because tire plug kits can have slightly different installation requirements.
Safety Checks Before Starting
Park on a stable, level surface away from moving traffic. Activate your hazard lights, engage the parking brake, and turn off the engine.
Inspect the tire carefully. External plugging should only be considered as a temporary emergency measure for a small puncture in the central tread area.
Do not attempt to plug a sidewall, shoulder, or large puncture. If the tire was driven flat, has visible structural damage, or cannot hold air, arrange professional assistance instead.
How to Use a Tire Plug Kit: Step-by-Step Instructions
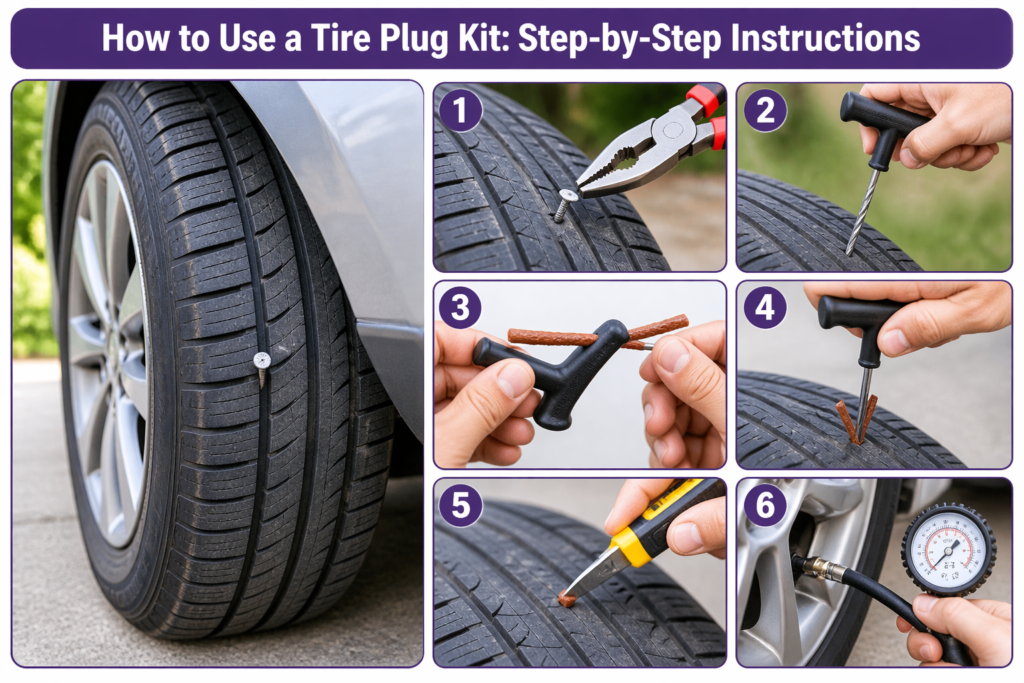
Using a tire plug kit involves locating the puncture, preparing the hole, inserting a rubber plug, and checking for leaks. The procedure is generally straightforward, but each step requires attention. These instructions describe a temporary emergency repair for a conventional tubeless tire, not a permanent repair approved by tire manufacturers.
Step 1: Locate the Tire Puncture
Begin by examining the tire tread for nails, screws, or other sharp objects.
If the puncture is difficult to find, spray soapy water over the tread and look for continuously forming bubbles.
Mark the location once identified. Check that the puncture is within the central tread area and appears no larger than 1/4 inch (6 mm).
Do not proceed if the damage is near the shoulder or sidewall, or if its extent is uncertain.
Step 2: Remove the Nail or Sharp Object
Use needle-nose pliers to grip the embedded object firmly.
Pull it out carefully, observing the angle at which it entered the tire. Avoid twisting excessively or causing additional damage.
Air may escape quickly once the object is removed.
Keep the puncture location visible so you can immediately prepare it for plugging.
If the tire is completely flat or visibly damaged, do not attempt to drive on it.
Step 3: Prepare the Hole With the Reamer Tool
Take the reaming tool from your tire repair kit.
Insert the pointed end into the puncture, following its original angle. Carefully twist and move the tool according to the kit’s instructions.
The reamer clears debris and prepares the channel for the rubber plug.
Avoid excessive force or unnecessary enlargement. If the tool cannot enter normally, stop rather than forcing it and potentially causing further damage.
Step 4: Insert the Rubber Plug Into the Tool
Remove one sticky rubber plug from its protective packaging.
Thread it through the opening of the insertion tool, positioning approximately equal lengths on both sides.
Some kits recommend applying a small amount of rubber cement. Follow the specific product instructions.
Keep the rubber plug clean and avoid touching it unnecessarily.
Once the plug is properly positioned, you can proceed with insertion.
Step 5: Push the Plug Into the Puncture
Align the loaded insertion tool with the prepared puncture.
Push the rubber plug into the tire following the kit’s recommended depth. For a typical string-plug kit, a short portion of the plug remains visible above the tread.
Carefully withdraw the insertion tool while allowing the rubber plug to remain inside.
The plug should stay secured in the puncture channel. If it pulls out completely or fails to seat, stop and seek professional assistance.
Step 6: Trim the Excess Rubber Plug
After removing the insertion tool, inspect the plug.
If the kit instructions recommend trimming, use a sharp blade to cut the exposed material close to the tread surface.
Avoid cutting into the tire or pulling on the plug while trimming.
The remaining rubber should sit securely inside the puncture.
Do not consider the repair complete until the tire is inflated and checked for air leaks.
Step 7: Inflate the Tire to the Correct Pressure
Connect a portable tire inflator or air compressor to the valve stem.
Inflate the tire to the vehicle manufacturer’s recommended pressure.
You can usually find the correct pressure on the driver’s door-jamb placard or in the owner’s manual.
Do not use the maximum pressure printed on the tire sidewall as the normal inflation target.
Check the pressure with a reliable tire gauge.
Step 8: Check for Air Leaks
Spray soapy water over the plugged area.
Observe the surface for expanding bubbles that indicate escaping air. Also check the valve stem for possible leaks.
If the tire continues losing pressure, do not drive on it.
Even when the plug appears to hold, this is only a temporary emergency measure. Have a qualified tire technician remove and internally inspect the tire as soon as possible.
Common Mistakes to Avoid When Using a Tire Plug Kit
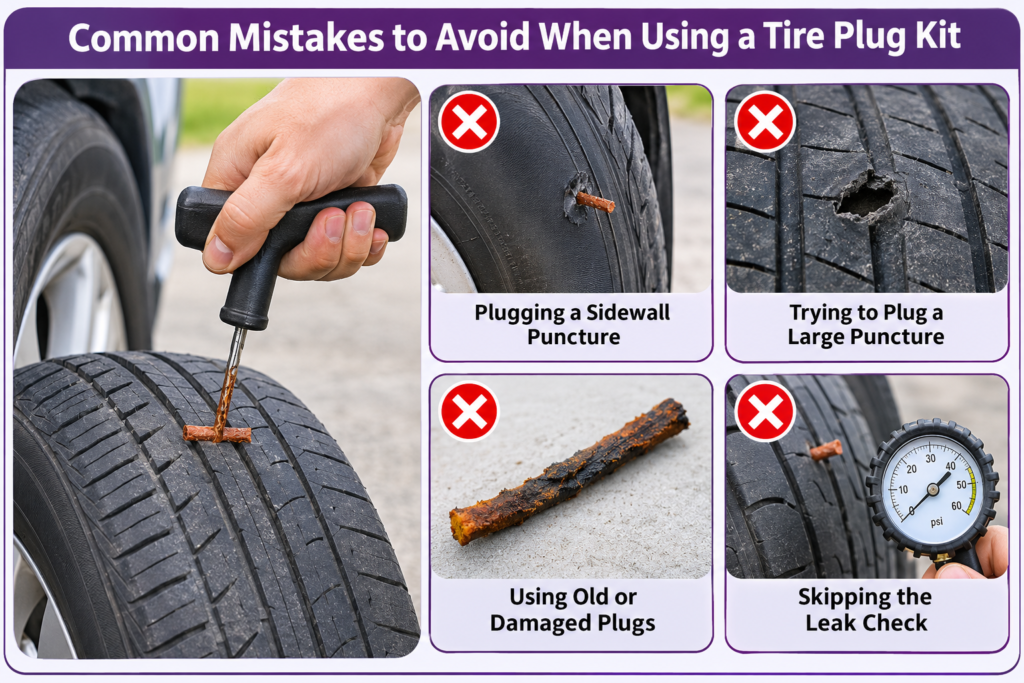
Although tire plug kits are relatively simple, incorrect use can lead to continued air loss or tire failure. Understanding common mistakes helps you recognize when a repair attempt is unsafe. Most importantly, a successful leak test does not prove that the internal structure of the tire is undamaged.
Plugging an Unsafe Puncture
One serious mistake is attempting to plug damage outside the repairable tread area.
Never plug a sidewall or shoulder puncture. Similarly, a puncture larger than 1/4 inch (6 mm) generally requires tire replacement rather than repair.
Bulges, exposed cords, deep cuts, and evidence of driving while flat are also warning signs.
Incorrect Plug Installation
The rubber plug may fail to seal if it is poorly positioned or inserted incorrectly.
Avoid these common errors:
- Using dirty or damaged rubber plugs
- Forcing a reamer through an unsuitable puncture
- Ignoring the manufacturer’s insertion instructions
- Cutting or disturbing the seated plug
- Driving without checking tire pressure and leakage
Do not repeatedly insert plugs in an attempt to seal a damaged or unsuitable tire.
Treating a Temporary Plug as Permanent
A common misconception is that an external tire plug permanently restores the tire.
A proper permanent repair requires removing the tire from the wheel, checking for internal damage, filling the puncture channel, and sealing the inner liner with a patch.
A plug alone is not an acceptable permanent repair under established passenger-tire industry guidance.
How Long Does a Tire Plug Last?
The lifespan of an external tire plug varies depending on puncture size, installation quality, tire condition, and driving conditions.
Some plugs may continue holding air for extended periods, but this does not establish that they are safe for long-term use.
A tire can have hidden damage even when air pressure appears normal.
For this reason, treat a roadside string plug as a temporary emergency solution and arrange professional inspection promptly.
Can You Drive With a Plugged Tire?
A temporary plug may allow limited travel to reach a nearby repair facility when the tire holds pressure, the vehicle feels normal, and the tire manufacturer’s instructions permit it.
Avoid high-speed driving, heavy loads, and long journeys.
There is no universally safe distance or speed for driving with an external plug. If you notice pressure loss, vibration, or unusual handling, stop safely and arrange assistance.
Tire Plug vs. Tire Patch: What’s the Difference?
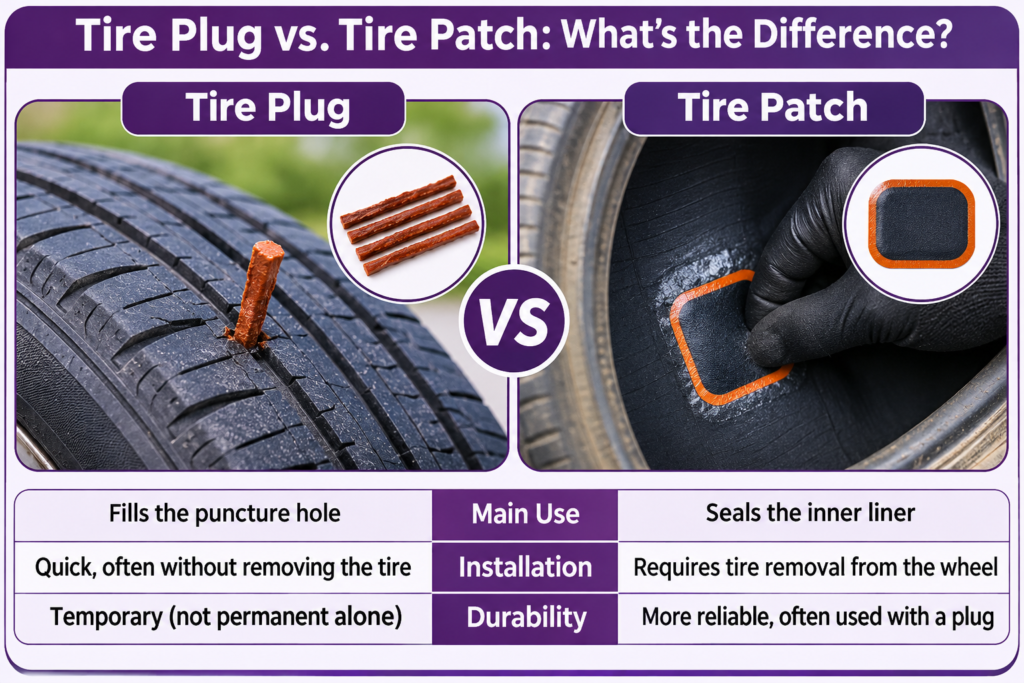
Tire plugs and patches serve different purposes during puncture repair. A plug fills the puncture channel, while a patch seals the tire’s inner liner. Although these methods are sometimes discussed as alternatives, proper professional puncture repair generally combines both functions. Understanding this difference helps you choose an appropriate repair rather than relying on a temporary solution.
| Feature | Tire Plug | Tire Patch |
|---|---|---|
| Application | Inserted into puncture | Applied to inner liner |
| Tire removal | Not usually required for emergency string plug | Required |
| Main function | Fills puncture channel | Seals internal surface |
| Permanent alone? | No | No |
| Recommended repair | Combined with internal patch | Combined with puncture filling |
For a repairable passenger tire, a trained technician should use an approved combination plug-patch repair or equivalent two-part procedure.
FAQs
1. Can I Use a Tire Plug Kit Without Removing the Tire?
Yes, many string-plug kits allow you to insert a temporary plug while the tire remains mounted. However, this is only an emergency measure. Proper permanent repair requires removing the tire from the wheel for internal inspection and an approved plug-patch procedure.
2. Do I Need Rubber Cement When Using a Tire Plug Kit?
Not always. Some tire plug kits contain self-vulcanizing rubber strings, while others include rubber cement as part of their installation process. Follow the manufacturer’s instructions for your particular kit. Never substitute household glue or an adhesive not intended for tire repairs.
3. Can I Use a Tire Plug Kit on a Motorcycle Tire?
Some tubeless motorcycle tires may accept emergency plug products, but repair policies vary considerably among manufacturers. Motorcycle tires face different safety demands, especially at high speeds. Check the tire and motorcycle manufacturers’ guidance and seek professional assistance rather than assuming a car tire repair procedure is suitable.
4. Can You Plug a Tire More Than Once?
A tire with multiple punctures requires professional assessment. Repairability depends on the damage locations, spacing, tire condition, and manufacturer requirements. Repairs must not overlap. Never keep adding external plugs to a leaking tire or attempt another repair over an existing improper repair.
5. Is a Tire Plug Kit Better Than Tire Sealant?
A string-plug kit can be useful for certain small tread punctures, while tire sealants may temporarily address some leaks without removing the puncturing object. Neither replaces a professional inspection. Sealants can also have compatibility limitations involving tire-pressure monitoring systems and subsequent repair procedures.